-
WordPress and SQLite
For a long time I have hated MySQL with a passion. I guess mostly because it is cumbersome. Requires additional credentials, is non-trivial to host on desktop OSes, most of the time requires an additional UI for management, such as PHPmyAdmin.
It is probably reasonable for a project like WordPress to use it as storage, given it can scale moderately easily and comes preinstalled on many web hosts. But in recent years, I have come to really like SQLite as an alternative. Most of the projects I work on focus on a single user, or are websites that have a few 100 visitors a day at most. This is something that SQLite can easily handle, especially if you use some sort of caching mechanism with it.
The things I like about SQLite are the portability and simplicity. Portability in a sense that I can just download the website directory and it will contain the files *and* database. Simplicity just because there are fewer column data types to handle. A string is always TEXT and a number is INTEGER, most of the time anyway. Prevent the file from being downloaded in the browser, either by placing it outside the document root, or by 403ing the file extension via .htaccess (which I prefer, because then the database can stay with the website code and assets.)
For the past decade I have looked for solutions for using WordPress with a SQLite DB, each time finding out either there is no solution, or it’s to cumbersome or unmaintained to use. Listening to a recent episode of ATP, I stumbled onto wp-sqlite-db. It does everything!
I read up on it and decided to give it a go (with this very blog!) It turns out, I had not read up on it enough, and it doesn’t *convert* your existing MySQL database to SQLite, it just creates a new DB (as a file) and WordPress thinks it’s a fresh install. Bummer.
I used some recent experience converting a SQL dump to SQLite with the aptly named mysql2sqlite – and it worked. (A few weeks back I modified Shaun Inman’s Fever to run on PHP 8+ and SQLite, so I knew this could work)
I guess now I need to look into some caching plugins, in case a million people all of a sudden start to read my blog. But at least, this is some behind-the-scenes progress. (Had to fix up my theme a little, too, for the Twitter archive to work again. Thanks, Elon!)
Leave a Reply
-
Response
-
OMG it actually happened and I have them in my hand right now!
Leave a Reply
-
-
Set up a simple(ish) HTTP/2 webserver on macOS
There have been moments where having HTTP/2 on localhost would have been handy. Over the years I have tried a few things and recently I found a way I liked. I tend to dislike having to install too many things, but for this, it seems impossible to avoid. My instructions are based on macOS Catalina (10.15) (for Safari), but should work for previous versions and future versions as well.
My steps were:
From the Terminal app, generate a self-signed certificate to use for SSL. (maybe change to the directory you’d like to store the certs in first?, in my case “/Users/oelna/.certificates”)
openssl req -x509 -nodes -newkey rsa:2048 -keyout key.pem -out cert.pemThis will create two .pem files (without setting a password for the key, which I found invaluable on a local machine, since I don’t want to enter a password every time I start the server.)
During creation I chose to put in some reasonable values for country name, organization name and common name (“localhost.”).
I tried to figure out a way to do this with the Python built-in HTTP server, but couldn’t, so I begrudgingly installed twisted for Python 3.
pip3 install twistedDepending on where you saved the .pem files generated earlier, you may have to adjust the paths for them in the following start command for twisted:
twistd -n web --path=. -c /Users/oelna/.certificates/cert.pem -k /Users/oelna/.certificates/key.pem --https=4433The parameters are pretty self-explanatory: -c is the certificate location, -k is the key file location, –https is the port the server will listen on, and –path is your website root (Most of the time I run the command from the directory the files are in, so I just put . there (=current directory)
Twisted should start up and if it doesn’t fail, your site is ready for you at https://localhost:4433
Safari will complain, when you load the page, but you can click your way through.

Chrome is a completely different beast, though, and I have needed to make a few changes to how the certificates are created.
Chrome
The instructions above worked well for me, but for Chrome I needed to go about it a little differently (sadly, more complicated). For this I used the instructions on Stackoverflow.You need to become your own CA (“certificate authority”) and trust it on your machine. This fake CA will issue a certificate for localhost (which has to include something called subjectAltName). The resulting certificate for localhost also needs to be imported to Keychain and trusted for use with SSL. Let’s do it!
# generate the CA key and cert
openssl genrsa -des3 -out myCA.key 2048
openssl req -x509 -new -nodes -key myCA.key -sha256 -days 825 -out myCA.pem
Prepare this localhost.ext file beforehand:
authorityKeyIdentifier=keyid,issuer
basicConstraints=CA:FALSE
extendedKeyUsage=serverAuth,clientAuth
keyUsage = digitalSignature, nonRepudiation, keyEncipherment, dataEncipherment
subjectAltName = @alt_names
[alt_names]
DNS.1 = localhost
IP.1 = 127.0.0.1
Next, generate a key and certificate signing request for localhost. (I think I read that when asked for the “common name” for the cert, you should put a period at the end, to make it a fully-qualified domain name (FQDN), like so: “localhost.”). It worked for me.
The “days” parameter can’t be larger than 825 on macOS, so that’s what I put.openssl genrsa -out localhost.key 2048 openssl req -new -key localhost.key -out localhost.csr openssl x509 -req -in localhost.csr -CA myCA.pem -CAkey myCA.key -CAcreateserial -out localhost.crt -days 825 -sha256 -extfile localhost.extImport myCA.pem and localhost.crt into macOS Keychain Access.app
“Get Info” on both of them and trust them with “Always Trust”.If ever you need a .pem file of the cert, just concat the .crt and .key like so:
cat localhost.crt localhost.key > localhost.pemWith these newly created and trusted certificates you can finally run Twisted again. Chrome will complain, but this time, you’ll be able to click through!
twistd -n web --path=. -c /Users/oelna/.certificates/localhost.crt -k /Users/oelna/.certificates/localhost.key --https=4433
Leave a Reply
-
Digitaler Corona-Impfnachweis – was ist so schwer?
Ich gebe zu, ich habe mir erst seit ein paar Stunden Gedanken darüber gemacht, aber als ich gelesen habe, wer gerade alles an der Technik zum digitalen Impfnachweis der Bundesregierung arbeitet, musste ich mir schon etwas an den Kopf greifen.
Das Bundesministerium für Gesundheit hat IBM, Ubirch, govdigital und Bechtle mit der Entwicklung einer Impfpass-App beauftragt.
Vor kurzem stand da noch mehr und genaueres, über wie viele Leute da beteiligt sind, aber mal ganz ehrlich: hätte da nicht auch ein Team von einer Hand voll Leute gereicht? Ist das nicht schon wieder Design by committee? Was ist denn überhaupt der Job?
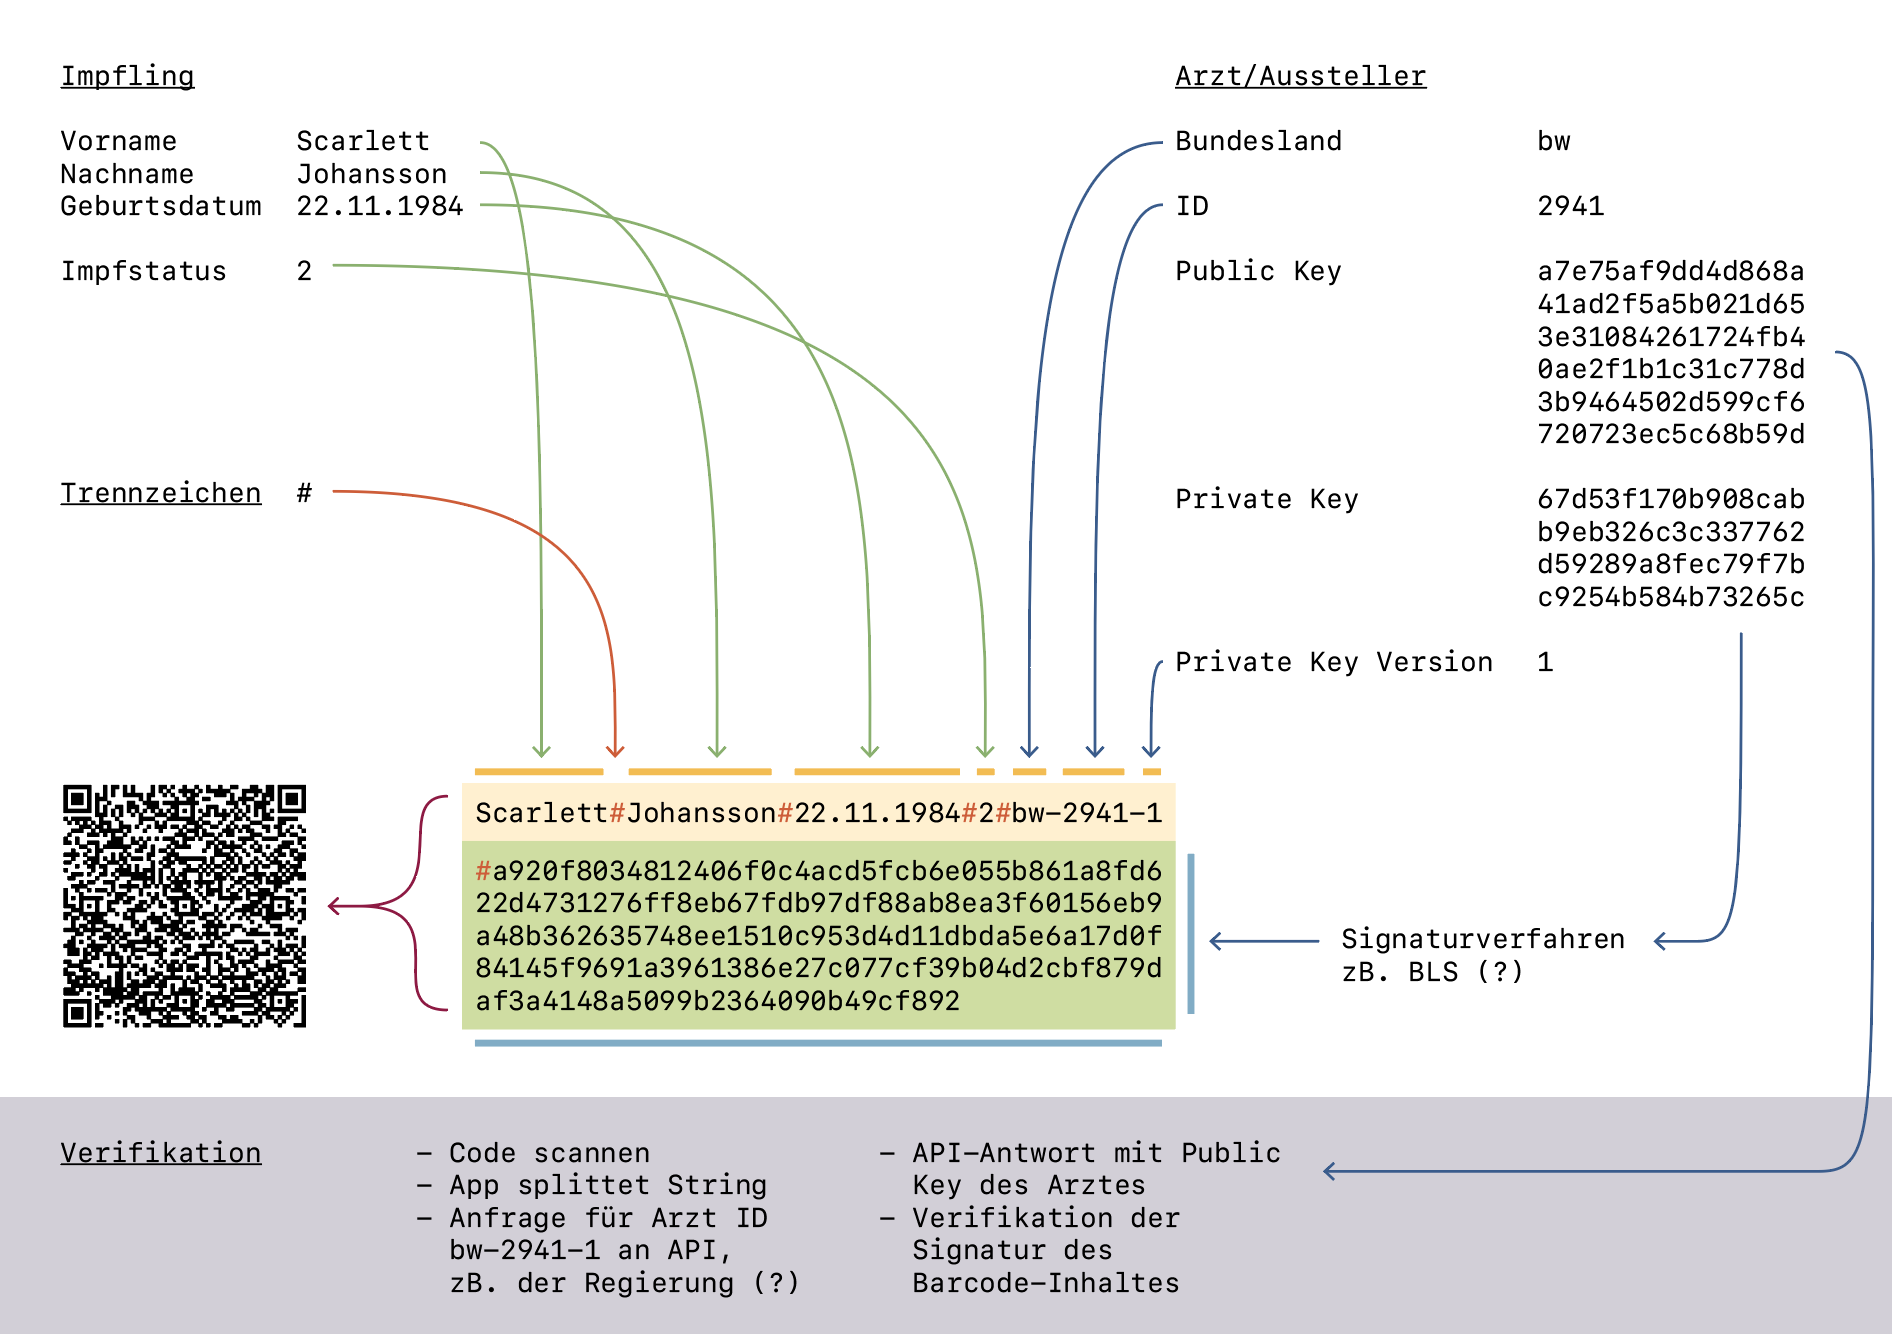
Der digitale Impfnachweis wird in der Arztpraxis oder in einem Impfzentrum generiert. Nach Eingabe oder Übernahme der Daten wird ein 2D-Barcode erstellt, den die Nutzer direkt abscannen können oder auf einem Papierausdruck mitbekommen und später einscannen können.
Man muss also:
- einen fälschungssicheren QR-Code machen, im dem steht, dass jemand geimpft wurde
- viele Ärzte und Impfzentren in ganz Deutschland müssen ihn ausstellen können
- Personen und Unternehmen sollen ihn einfach verifizieren können
Ich denk, das ist es doch schon. Ich bin wirklich kein Profi, was Crypto-Sachen angeht, aber interessiere mich schon lang dafür. Nach kurzer Recherche stellt sich heraus, dass es mit quasi fertigen, anerkannten Mitteln, zB. BLS, recht einfach ist, eine kurze Signatur für einen Text zu erzeugen (oder mit Klassikern wie PGP eine lange Signatur?). Ist man dann nicht schon fertig, wenn man die benötigten Daten und die Signatur in einen Barcode packt? Ich hab das mal in einer Grafik zusammengebastelt, wie ich mir den Ablauf vorstelle.
Sicher, ganz so einfach ist es wahrscheinlich nicht, aber ich bin ja auch kein mehrköpfiges Team. Wenn man noch einrechnet, dass man eine kleine API zur Abfrage der Public Keys der Ärzte ganz Deutschlands braucht und vielleicht noch ein browserbasiertes Frontend basteln muss, das die Ärzte bedienen können, braucht man sicher eine Woche, bis es rund läuft. Ich bin kurz davor, das als Proof-of-concept schnell selber zu machen. Klingt doch spannend.
Wenn jemand wirklich was vom Thema versteht, freue ich mich über Kommentare. Ansonsten lehne ich mich jetzt zurück und beobachte, wie sich das Thema weiter entwickelt.
Update
Natürlich konnte ich es nicht sein lassen: Demo des Projekts auf GitHub (Source)
Anmerkungen
- Der im Beispiel erzeugte QR-Code ist zwar groß, aber noch im Bereich des Akzeptablen IMO. Denke es klappt auch noch mit längeren Namen.
- Die Ärzte-ID hab ich mir frei ausgedacht. Wie viele Ärzte wird es pro Bundesland geben? So maximal 400.000? Wenn man die ID als Base-36 speichert, klappt das mit einer vierstelligen Kennung.
- Die Private Key Version hab ich mal vorgesehen, falls einer der Ärzte gehackt, oder seinen Key verliert und man einen neuen Key generieren muss. Macht Sinn, denke ich.
- Evtl ist es noch schön, irgendein Datum noch mitzuspeichern. Erstelldatum, Impfdatum, oder sowas. Dann hat mans später leichter, mit welche Key-Version man verwendet, falls ein Arzt mehrere hat.
- Der Impfstatus ist in meinem Beispiel aktuell nur eine Zahl, für 1 oder 2 Mal geimpft. Das könnte auch ein Status-Code sein, für welchen Impfstoff man bekommen hat. Oder man speichert noch die Nummer vom Impfstoff-Fläschchen mit ab, wie in den USA.
- Den Beitrag der Pharmazeutischen Zeitung zum Thema fand ich noch ganz interessant. Auch wenn der Barcode im Beispiel (leider?) nur zu einem Youtube-Video über den Jägerhof in Mutterstadt führt.
Responses
-
Scarlett Johansson wurde in Baden-Württemberg geimpft?!?! Da hätte ich gern die Spritze verabreicht.
-
@spam’oaler Ich denk, auf deine 0.5ml Injektion kann sie verzichten :P
-
Interessant Danke!
-
also du bist nicht der einzige der da so denkt. ich finde deine Ansätze super und das passt und reicht auch völlig…
es sollten hier viel mehr unabhängige berater hinzugezogen werden.
wofür bekommt denn die apotheke 18 Euro für 6 felder ausfüllen und einen Ausdruck????
Leave a Reply
