-
Nerdabende Archiv Update
Heute habe ich die nächsten 5 antiken Nerdabende von 2014 freigeschaltet. For your consideration:
https://oelna.de/blog/4710 29.08.12
https://oelna.de/blog/4762 04.09.14
https://oelna.de/blog/4767 19.09.14
https://oelna.de/blog/4777 02.10.14
https://oelna.de/blog/4780 04.10.14
Es hat sich leider herausgestellt, dass in meinem ersten Artikel zum Thema ich leider die ersten Nerdabende nicht chronologisch korrekt veröffentlicht habe, daher sind hier ein paar dabei, die noch an den Anfang gehörten, aber who cares, really?
-
Open Door
Von Zeit zu Zeit denke ich darüber nach, dass während meiner Studienzeit an der Hochschule es einen Wechsel des Dekanpostens gab. Schwarz war raus, Hartmut “Habu” Wöhlbier drin.
Er hat sicherlich vieles anders gemacht als seine Vorgänger, aber eine Sache scheint mir im Rückblick sehr visionär und profund. Wo vorher das Dekanat und die Professoren in ihren Zimmern eine Autorität waren und man Termine brauchte, um eine Audienz zu bekommen, gab es bei Habu eine Open Door policy. Das heisst, wenn er im Büro war und nicht in einem Gespräch, war seine Tür offen. Man konnte von weit schon sehen, ob er da war und man konnte jederzeit (!) einfach die kleine Treppe (wir waren in Bau 11, 2. OG, was jetzt Bau “L” heisst) hoch und kurz reinschauen. Die Chance, dass man sein Anliegen unbürokratisch in den nächsten 2 Minuten erledigt hatte: hoch!
Das erscheint mir aus heutiger Sicht extrem schlau, menschlich und pragmatisch. Es gab keine Autorität per se, man war einfach zwei Personen in unterschiedlichen Rollen an der Hochschule und man konnte auch ganz normal miteinander reden. Irgendwie haben die Semester, in denen er Dekan war, einen großen Eindruck hinterlassen bei mir und einer der Faktoren, über die ich manchmal sinniere, war diese niederschwellige Art, die Fakultät zu leiten.
Keiner nach ihm hatte die Tür offen und oft mussten Anliegen langwierig über Email gelöst werden.
Wenn ich Dekan bin, werde ich es auf jeden Fall genau so halten wie Habu damals 2005 (?)
Fediverse reactions
-
Nerdabende Archiv 2012-2019
In einem vergangenen Beitrag habe ich kurz über die gute alte Zeit gesprochen und wie sich während des Studiums eine gediegene Backseat-Gaming-Situation für mich eingestellt hat. Nach dem Ende des Studiums kam man irgendwie nicht mehr so regelmässig dazu wie davor, aber ich habe mit Christophe die Tradition noch extrem lange aufrecht erhalten (bis Corona!) und versucht, mich einmal in der Woche zu treffen, dass wir auf dem Laufenden bleiben, was Videogaming angeht.
Im Laufe der Jahre nahmen die Treffen verschiedene Formen an, hauptsächlich Mittwoch oder Donnerstag Abend, oft kombiniert mit einer sportlichen Aktivität (wegen Mens Sana In Corpore Sano?) und Essen.
Ich habe damals eigentlich fast immer einen Eintrag in der Day One App gemacht, was eine Journaling-App auf iOS ist. Die Einträge sind eigentlich nie als öffentlich gedacht gewesen, aber ich fand auch blöd, dass sie dort verrotten und ich bin ja dabei, meine Online-Präsenzen irgendwie zu konsolidieren. Darum habe ich eine Weile rumgemacht und ChatGPT hat mir 2-3 Importer und Konverter-Plugins geschrieben und jetzt sind die Einträge alle hier im Blog!
Inhaltlich ist das unspektakulär, aber es fühlt sich ordentlich an. Die Beiträge laufen in ihrer eigenen Kategorie (“Nerdabend”, was sich als Begriff für die Treffen etabliert hatte, bevor der Begriff belastet war).
Ich will irgendwie schaffen, dass man da noch mehr mit machen kann aber immerhin sind die Beiträge mal da und man kann sie anschauen. Ist auch ein Verlauf über verschiedene iPhone-Kamera-Modelle, also von daher auch interessant.
Ich will als nächstes mal eine bessere Kategorie-Ansicht im Blog erstellen, dass man das etwas schöner navigieren und überblicken kann. Und die Beiträge haben Tags für die gespielten Spiele, vielleicht kann man damit auch irgendwie was noch machen.
Besser, ihr erwartet da keine literarischen Meisterwerke wie sonst, wie gesagt, das waren eigentlich nur private Notizen über was an dem Abend gemacht wurde. Ich schau die Einträge mal alle nach und nach durch und schalte sie dann frei; hier schonmal die 5 ältesten. Enjoy!
Comments
Leave a Reply
-
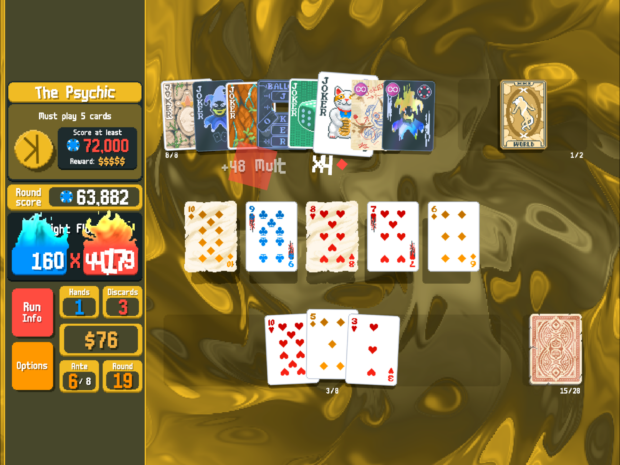
Balatro
Solange bis Slay the Spire 2 für iOS erscheint, muss man seine Zeit am iPad mit etwas anderem verbringen. Na klar, das originale Slay the Spire ist immer noch top, aber für wenn man mal was anderes möchte, habe ich Balatro wirklich zu schätzen gelernt.
Ursprünglich habe ich natürlich mitbekommen, als es erschien und viele Streamer sich damit auseinandergesetzt haben, aber so wirklich geklickt hat es erst, als ich gesehen habe, dass Roffle, den ich für Hearthstone (Wild) abonniert hatte, fulltime dazu gewechselt hat. Seitdem habe ich viel seinen Stream geschaut, aber auch selbst gespielt natürlich.
Ich mag besonders das simple, nicht pay-to-win Preismodell, die liebevolle Gestaltung und dass man jederzeit unterbrechen kann, auch um mal nur 1-2 Hände schnell zu spielen.
Und für die Vollständigkeit: Balatro ist ein Kartenspiel, bei dem man aus einem Pokerdeck versucht, Hands zu ziehen wie Paare, Flush oder Full House und man bekommt Punkte dafür. Der Twist ist, man kann nach jeder Runde in einem Shop seine Karten verbessern oder Joker kaufen, die die Berechnung der Punktzahlen verändern. Klingt lame, aber macht mega Spaß.
Comments
Leave a Reply
-
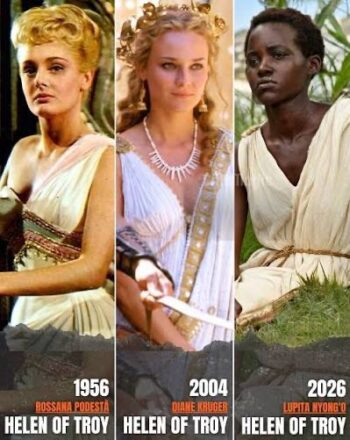
Helena von Troja
Also ich muss das irgendwie total verpasst haben, aber anscheinend regen sich Leute schon wieder auf über die Besetzung von Helena in der upcoming Verfilmung der Odyssee?
Haben irgendwie alle den Schuss nicht gehört oder was? Dann voted halt mit eurem Geldbeutel und schauts euch nicht an? Wie peinlich kann man sich aufführen, wenn man meint, man hätte irgendeine Deutungshoheit auf ein literarisches Werk, das man am Ende nichtmal gelesen hat, sondern 2017 in einer “zu verschenken” Kiste auf DVD gefunden hat?
No offense, aber ich fand Diane Kruger damals auch schon mega stier. Bin grade froh, wenn sie mal was anderes ausprobieren. Und nur weil die AfDler keinen drauf hoch kriegen können, heisst ja nicht, dass niemand das kann. Super ignorante Leute unterwegs mal wieder. Facepalm to the stars.
Comments
Leave a Reply
Comments
… reposted this!