 Scripting an InDesign progress bar for presentations

This post has some prose, so I’ll provide you with an easy out, if you have only come for the free stuff: jump to the making of, or download directly.
If you need help with the script installation, Indesignsecrets has you covered. I put mine in the folder ~/Library/Preferences/Adobe InDesign/Version 8.0/en_US/Scripts/Scripts Panel
If you like it, consider a tiny donation. However much it helped you. I appreciate it.
[flattr user=”oelna” title=”Blog: InDesign Progress Bar with Scripting” url=”http://oelna.de/blog/?p=779″]
As a designer, you tend to do a lot of presentations. Some more than others, but still: you better know your stuff. In a recent push to bring ultrabold’s (mostly) PDF presentations into the new decade, I suggested they finally switch to a widescreen default, as most of the clients have moved to screens that match the wider resolutions. Also, many of the PDFs are actually shown in-house on a widescreen TV. I’m hoping this will catch on.
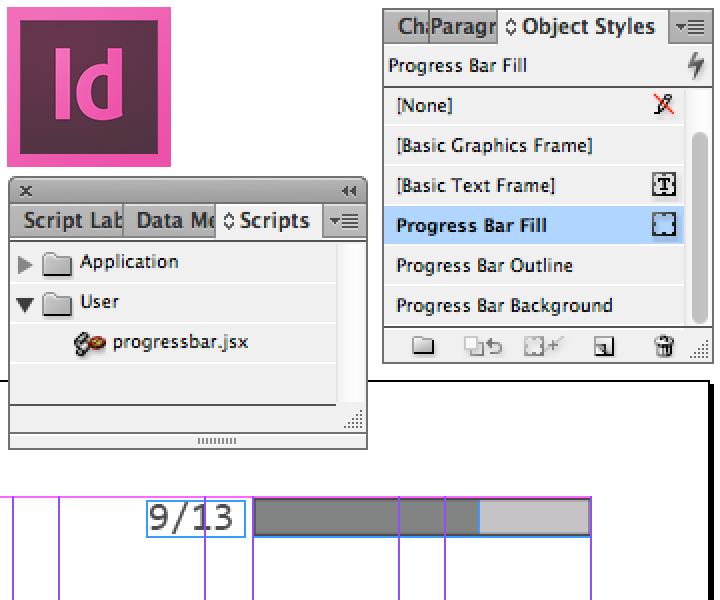
But I also wanted to add a little flair to the actual slides, or pages if you will. As the recipient, I also enjoyed when there was a visual indicator of how far along a presentation was. Most of the time, this is a page number. If you are lucky, the total page number is displayed next to it, so you can actually make use of the information. But as a presenter, you don’t want your audience occupied with math all the time, so I figured some sort of progress bar, which is commonplace in the software industry, could provide the information on a more subtle level.
Many designers make their PDF presentations in Adobe InDesign, which is a great fit (I believe it is the best program Adobe has in their lineup). It is not intuitive how you would make something like a progress bar happen in InDesign, though. As the interface did not get me to where I wanted to be, I turned to Google DuckDuckGo, and the consensus was: use scripting. I happen to know some JavaScript, so this looked like a welcome out back to my code editor. I figured the script needed to read the total amount of pages, iterate over all pages and place a rectangle of the appropriate proportion. Easier said than done. I know nothing about InDesign’s object names and methods, so I read a lot of stuff and slowly pieced together a solution.
The current version of my œuvre pops up a dialog in which the designer can specify width and height of the progress bar, as well as top and right margins. I figured most bars would be placed on the right, but it should be easy enough to calculate an offset for the left side. In addition, it is possible to specify a range of pages, as it may be useful to omit the first and/or last page of the presentation. They are usually a welcome and thanks for listening note and don’t carry actual content.
The script then creates up to three elements, depending on your preference – an optional background fill color, the bar itself and an optional border. At the same time, three object styles are created, so you can adjust the appearance of the bar with your own stroke and background colors. The code to create new object styles is easy, once you have figured it out. It avoids creating duplicates by trying to get the name property of the style first as a check.
var fill_style;
try {
	fill_style = app.activeDocument.objectStyles.itemByName('Progress Bar Fill');
	var check2 = fill_style.name;
}
catch(error_message) {
	fill_style = app.activeDocument.objectStyles.add({
		name: 'Progress Bar Fill',
		strokeAlignment: StrokeAlignment.INSIDE_ALIGNMENT,
		strokeWeight: 0,
		strokeColor: 'None',
		fillColor: 'Black'
	});
}
You can then apply the style to your page objects like this:
objPref.appliedObjectStyles = fill_style;or pass it directly to the add() method:
appliedObjectStyle: app.activeDocument.objectStyles.itemByName('Progress Bar Outline')The calculation of the actual progress bar width is rather easy (code is shortened):
for(var i=0; i<pages_total ; i++) {
	width = Math.round((progress_width/(pages_total-1))*i*100)/100;
}
The creation of the rectangle is pretty straightforward as well (code is shortened). The bounds variable is an array of coordinates: top, left, bottom, right.
var rectangle = app.activeDocument.pages[0].rectangles.add({
	geometricBounds: bounds,
	appliedObjectStyle: app.activeDocument.objectStyles.itemByName('Progress Bar Background')
});
I hope you get some use out of this. As this was my first dive into InDesign scripting, I’m sure it’s not perfect (as a matter of fact there is a debug flag in the script which enables various debugging messages). And I have benefitted of work others have done, mainly Jongware’s amazing HTML InDesign Help and countless people on StackOverflow who have had similar problems before me.
The dialog window was pieced together from various sample scripts that were present in InDesign.
Javascript is quickly becoming my favorite language. Who’d have thought only ten years ago? I’m excited. Next stop: Photoshop.